Stinkgo
So, in late August, my girlfriend and I moved into a lovely new apartment in the Slope, and everything was right with the world.
…until October. That’s when we were faced with our first true cohabitation challenge — the ginkgo tree outside our front door.

Let me get this out of the way first: the ginkgo is a wondrous species. The species is so hardy that it’s considered to be a living fossil. Several ginkgos even survived Hiroshima!
But, well, there’s no classy way to put this. The fruit of the poor ginkgo smells like death. In the words of the Washington Post, “the bouquet of a ginkgo tree’s fruit has strong notes of unwashed feet and Diaper Genie, with noticeable hints of spoiled butter.”
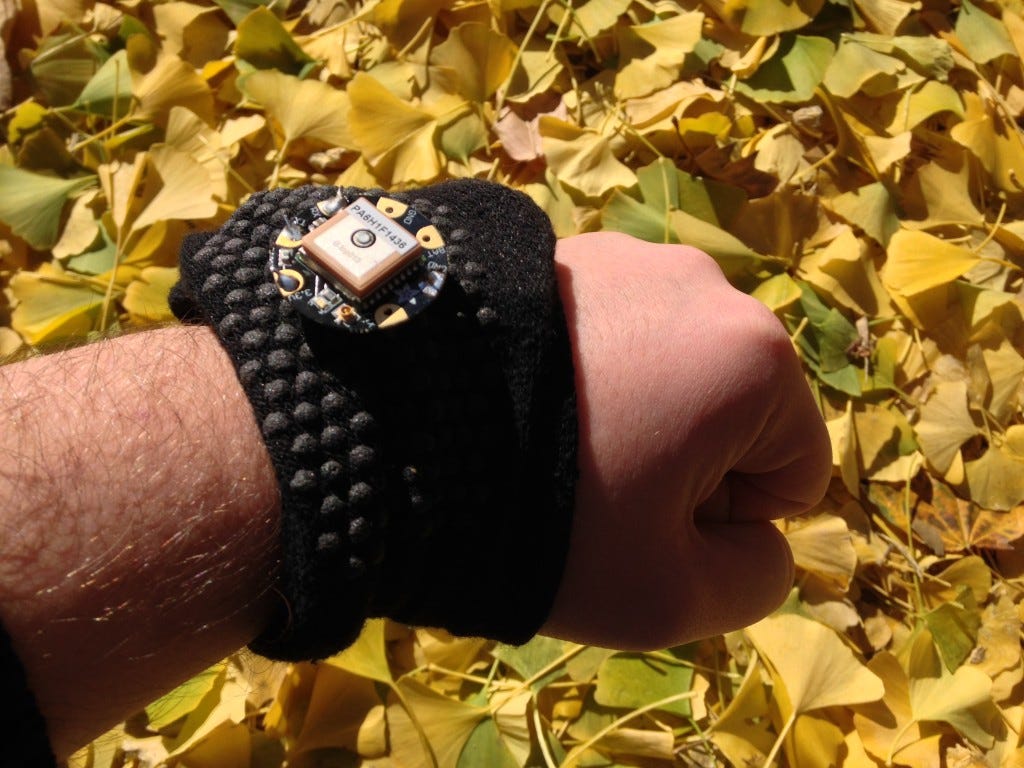
It’s truly untenable. So I built a wearable ginkgo detector that vibrates when the wearer walks within 100ft of one of these wretched, incredible beauties. I call it Stinkgo. (I also built a complementary web simulator at stinkgo.com, if you’d like to try it out without getting your hands dirty.)
Stinkgo consists of a Raspberry Pi (actually a low-power Pi clone designed for wearables called the ODROID W), a 750mAh LiPoly battery, an Adafruit Flora GPS unit, a vibration motor and a database of ginkgo trees.
The order of operations for this project was roughly as follows: 1) set up a local Postgres installation; 2) isolate the ginkgo trees from the city’s tree census data; 3) geocode lat/lng coordinates for the city’s ginkgos; 4) generate a geohash for each ginkgo; 5) set up the Raspberry Pi; 6) install WiringPi in order to access the GPIO outputs; 6) set up the Flora GPS receiver; 7) set up the PHP scripts; 8) solder; 9) detect nearby ginkgos!
I. SET UP POSTGRES
Though I’ve chosen to use Sqlite for the final product, I used Postgres to prepare the data, mostly because it offers comprehensive geolocation features via PostGIS. By far the easiest way to install Postgres on the Mac is to use Postgres.app, which offers a dead-simple one-step installation. Once you’ve got that going, you’ll need to connect to the database. I use an ancient free version of Navicat Lite, which is no longer being offered, but which you can download here. (Or you can use any PostgreSQL GUI you’d like.) You’ll just need to create a table for your ginkgos, with three columns: lat (float8), lng (float8), and geohash (varchar). (We’ll get to that last one in a moment.)
II. ISOLATE THE GINKGO TREES
The city offers its tree census data in borough-by-borough files, downloadable in many formats. The data includes a column for species, and by cross-referencing with this species list (PDF), we can tell that we’re looking for GIBI. There are many ways to do this directly in Postgres, but I just downloaded the CSV, opened it in Excel, deleted every column except BUILDINGNU, BUILDINGST, BOROUGH, ZIPCODE and SPECIES, and sorted by SPECIES. Then I deleted everything that wasn’t a GIBI. I repeated the process with the other boroughs, and created a master CSV with ~11,000 rows of coordinates.
III. GEOCODE GINKGOS
The shapefiles provided by the city actually includes geolocation data, but it sucks. It’s a rough estimate of street position based on the tree’s street address, but that estimate does not offer us the precision we need. (For the record, I did figure out how to isolate the coords from the shapefile: you’d need a command line tool called ogr2ogr, which you can install using these instructions. The shapefile uses EPSG 2263 projection, so you’d use a command kind of like this to create a CSV of coordinates, noting that you’ll actually get the longitude in the x column: ogr2ogr -f csv -s_srs EPSG:2263 -t_srs crs:84 -lco GEOMETRY=AS_XYZ bklyntrees.csv BrooklynTree.shp) So, instead, we turn to a rooftop geocoder! I used the Bing Maps API, piped through this absolutely wonderful geocoding tool. I actually had no trouble running several thousand requests through the tool at one time, but YMMV. It’s important to remember that geocoding is a murky business. Most of the results you’ll get from Google or Bing will geocode the street address to the center of the building. There’s no way to get accurate results geocoded to the sidewalk. It sucks, but it’ll suffice.
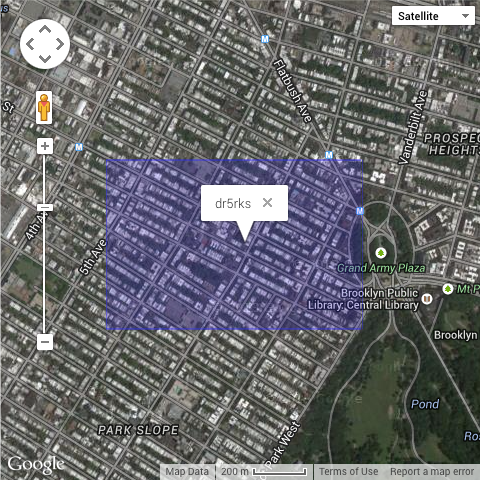
IV. GEOHASH GINKGOS
So, 11,000 trees is a lot of data to sift through. The Raspberry Pi actually needs to determine distance from the nearest tree every 3 seconds (using the haversine formula), and it’s simply not powerful enough to do that with so much data in such a short window. A friend pointed me to geohashing as a means of dividing the data into smaller, more workable chunks, and it worked beautifully. I wrote about geohashing on the SVA IxD blog, but the executive summary is that it’s an open-source algorithm for dividing the world into recursive grids. It adds a character for each level of precision, and 6 characters’ worth of precision gives us a grid that covers what would amount to about a 4-avenue x 5-block square of Park Slope (if the grid was aligned to the north). Fortunately, it’s really easy for us to calculate a 6-character geohash for each of our trees using PostGIS. The command would look something like this: UPDATE stinkgo SET geohash = (SELECT ST_GeoHash(ST_SetSRID(ST_MakePoint(lng,lat),4326),6));. Later, we’ll use a PHP class to geohash your realtime lat/lng with the same level of granularity. Then the script will pull only those records from the database that share the same geohash, so that the Pi only needs to calculate distance from, say, 70 trees, instead of all 11,000.
When you’re done, you can use Navicat to export your Postgres database into a CSV, and then reimport into a Sqlite file which you can upload to the Pi. This isn’t strictly necessary, of course, but it’s a little easier than setting up Postgres on the Pi and in my unscientific tests it’s also slightly quicker. Importantly, the PHP script I’ve written assumes that the database file is Sqlite.
V. SET UP RASPBERRY PI
There are many tutorials out there for this, but here’s a brief summary. I set up the Pi headlessly, and I’d recommend doing the same. (I used a stock B model for testing, then moved the SD card over to the ODROID W once everything was finished, as the ODROID W doesn’t have built-in networking and I felt no need to solder anything extra.) To do this, you’ll need to use Raspbian, not NOOBS. (NOOBS doesn’t support SSH out-of-the-box.) I did a lot of testing on the Pi so I installed a full Apache environment, but you really don’t have to. You just need to install PHP, the PHP development tools, git and Sqlite to get started (sudo apt-get install php5 php5-dev sqlite3 git-core).
VI. INSTALL WIRINGPI
In order to use the Raspberry Pi’s GPIO pins to control the vibration motor, we’ll need to use the WiringPi library. Specifically, since we’re using a PHP script, we’ll need the PHP wrapper. Basically, you’ll start by cloning the repository recursively (so as to get the main WiringPi library too):
git clone git://github.com/WiringPi/WiringPi-PHP — recursive
…and then find that folder, and create your build folder:
cd WiringPi-PHP
./build.sh
You’ll need to find the wiringpi.so file in the resultant build folder, and move it to /usr/lib/php5. Then you’ll need to set the pin type. Create a file at /etc/php5/conf.d/wiringpi.ini with the following info:
extension=wiringpi.so
wiringpi.pinmaptype=PINS
Later, in the PHP script, we’ll be controlling pin 1 (or GPIO 18), as that’s the only GPIO pin on the Pi with hardware PWM (pulse-width modulation) support, and we’ll need this to vary the intensity of the vibration motor depending on your proximity.
(Incidentally, I found pin mapping fairly mystifying, so I have to thank x1nick at avforums.com whose experience with WiringPi-PHP made this a lot easier for me. You can find that thread here. The wiringpi reference pages on pin definitions and special pin functions were also quite helpful.)
You’ll also need to find the wiringpi.php file and save it for later. We’ll need it to be in the same directory as our main PHP script in order to control the vibration motor.
VII. SET UP FLORA GPS
The primary resource for this is the Adafruit guide. It references their standard breakout board, but the Flora GPS is basically the same thing in a slightly altered form factor (and it takes 3.3v instead of 5v). Note that we’ll be using UART to connect to the Pi’s GPIO pins, rather than connecting via USB, so you’ll need to follow the instructions at the end of the document. You’ll also need to configure gpsd to work on boot. You can do this by running sudo dpkg-reconfigure -plow gpsd. As you’re answering the questions, use the same path from the Adafruit guide (/dev/ttyAMA0), and use the -n option to automatically poll the GPS board rather than wait for a client to connect.
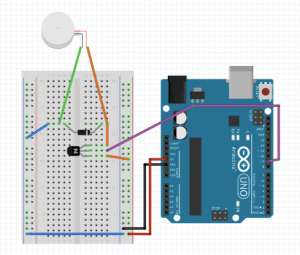
VIII. BUILD A MOTOR CIRCUIT
For the vibration circuit, you’ll need a vibration motor, a diode, a transistor and a chunk of stripboard. The transistor allows you to use the full 5v output of the pi while controlling the power of the motor using PWM, and the diode prevents power from flowing back into the pi when the motor shuts off. This is the basic circuit — just replace the Arduino with a Pi, and pin 9 with Wiringpi pin 1 / GPIO pin 18. (And, uh, the breadboard with stripboard.)
IX. SET UP PHP SCRIPT
Now you’ll upload the PHP script, which you can download via github. Note that the script outputs your coordinates to a file called log.csv. This is largely for troubleshooting. If you don’t want the log, just comment out the relevant sections of the script.
To execute the script every 3 seconds, I use a series of cron jobs. (Perhaps there’s an easier way to do this, but I don’t know what it is. Other than looping within the script, I guess.) Cron doesn’t get more granular than 1 minute intervals, so you’ll need to use the sleep function to trigger them at 3-second intervals. Make sure you’re editing the crontab as sudo, or else wiringpi won’t have access to the pins. Once you’re in the editor, you can format your triggers as follows:
* * * * * sleep 3; /your/path/to/stinkgo_wrist.php
* * * * * sleep 6; /your/path/to/stinkgo_wrist.php
and so on.
X. HOOK EVERYTHING UP
Here’s the pinout for the pi’s GPIO ports. It’s confusing, because there are several different ways to identify each pin. The PINS mapping we used during WiringPi-PHP setup above equates to WiringPi in the diagram below.
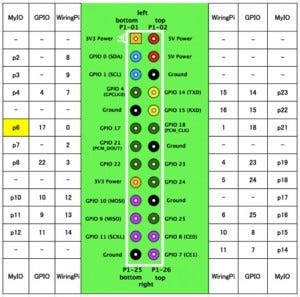
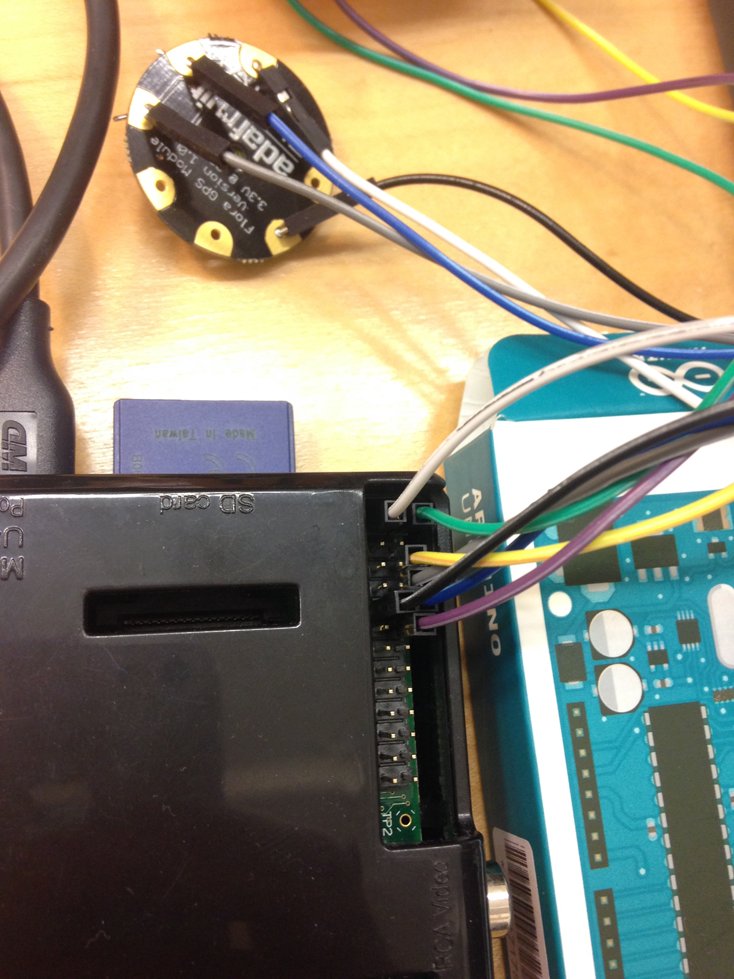
So, to hook up the GPS and the vibration motor, we’ll need the following (color coded according to my photo below):
GPS: 3.3v power, ground, RX (WiringPi pin #15), TX (pin #16)
(*NOTE: RX and TX must be switched when connecting to the GPS unit!)
Vibration motor: 5v power, ground, PWM pin (pin #1).
In the end, it should look like this (you can use a breadboard and alligator clamps to get this all temporarily set up before you solder):
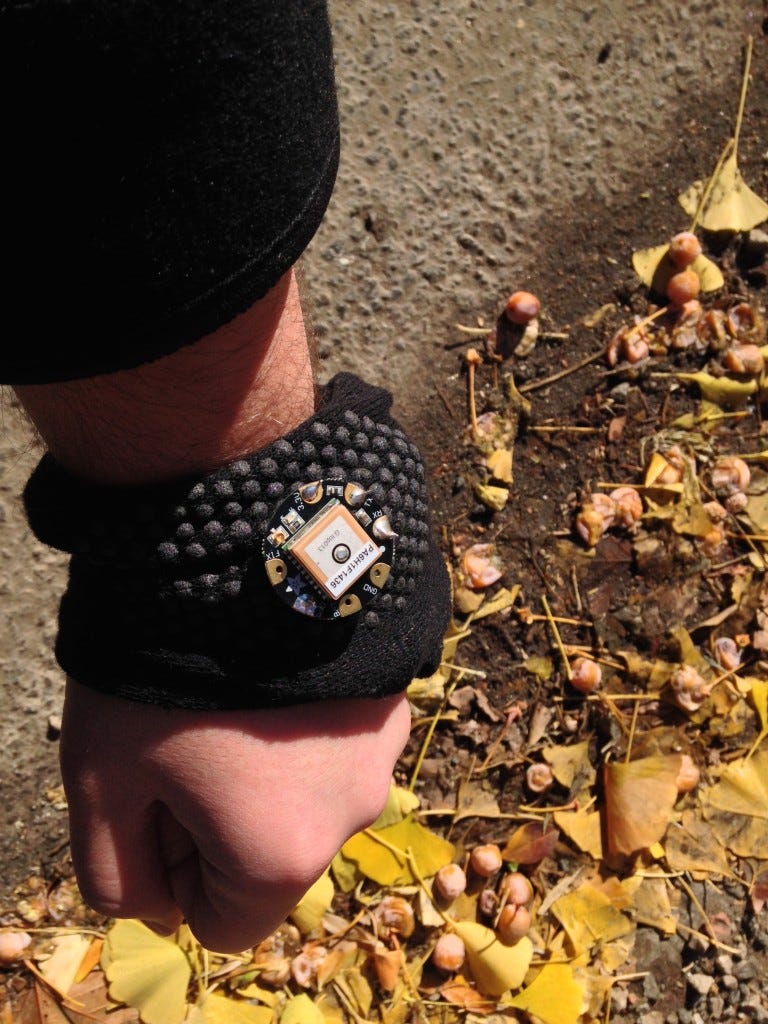
At this point, you’re basically done. Your software is running, your GPS is functional, your script is uploaded, and your wiring is complete. You should be able to attach a USB battery pack and go into the world to test. (The GPS requires line-of-sight. A window might do the trick, or it might not. Be patient. The red LED on the GPS will stop blinking when it has acquired a fix.)
XI. SOLDER
Now, you get to solder everything. For the GPS unit, solder the3.3v power, ground, TX and RX cables, switching RX and TX as mentioned above. For the vibration circuit, solder the 5v power, ground, and PWM pins as mentioned above. Assuming you’re also switching from the stock pi to the ODROID W, you’ll need to solder all the pins into the header. Here’s the pinout, color-coded as above — double-check that the board is oriented appropriately!
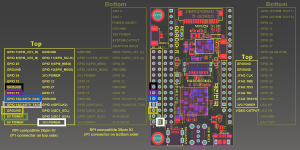
In my experience, once I switched the SD card over the ODROID W worked perfectly, with no additional configuration needed. Just solder with care!
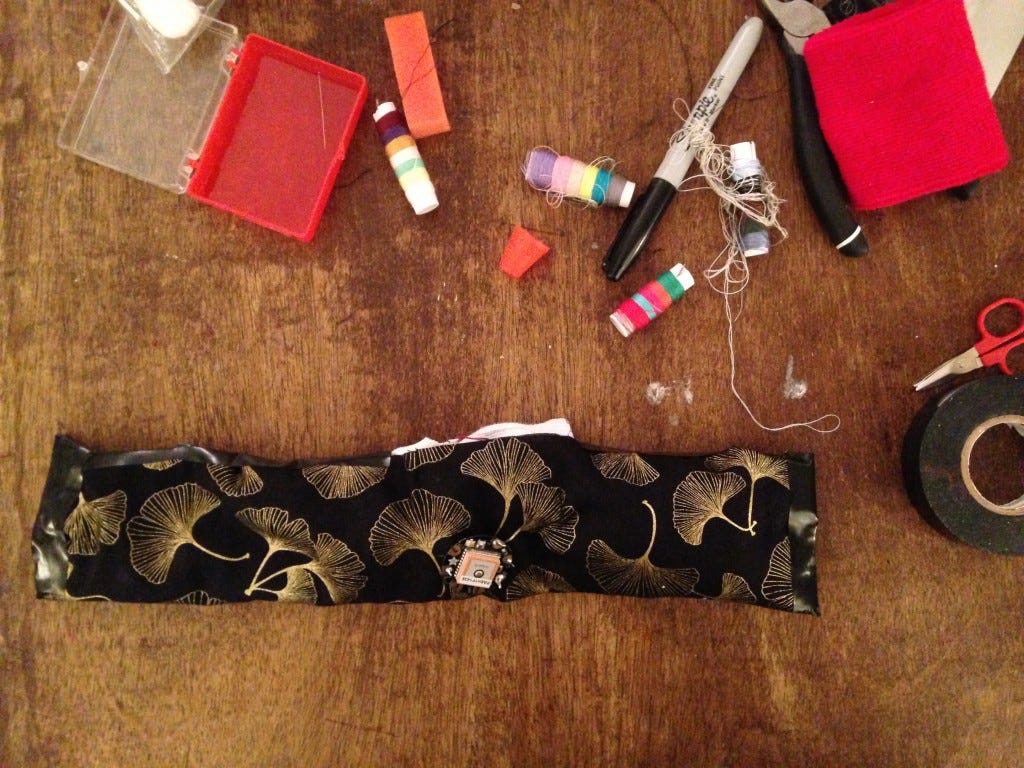
XII. SEW!
Once you’re all set up, sew your components into a piece of fabric (I used this ginkgo pattern) to create a wristband. You can use cotton batting (or, if you’re me, an old sock) to pad everything.
XIII. DETECT GINKGOS!
Congratulations! You have a ginkgo detector! Sadly, the trees are pretty bare and innocuous these days, but you can lie in wait until the next grotesque ginkgo berry season comes around, and then dazzle your buddies. Happy hunting!