PSL modem
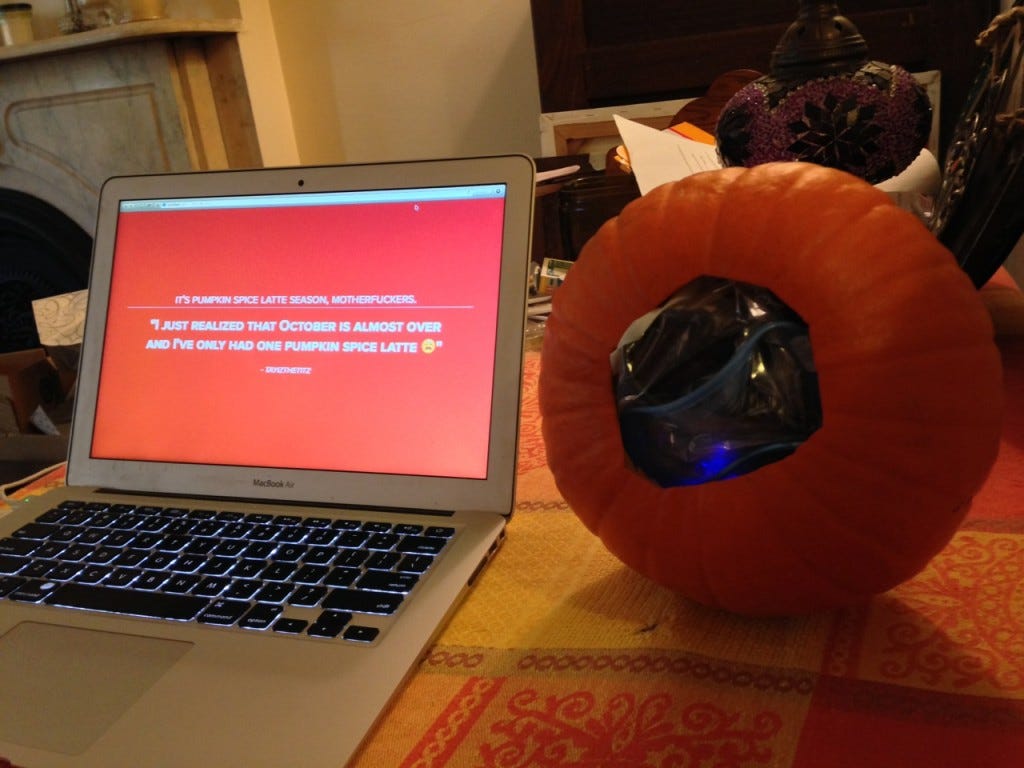
Fall’s vogue flavor seems to be the pumpkin spice latte. This limited-edition Starbucks concoction comes around every year, but things have finally gone viral. As a result, about a third of all pumpkin spice latte tweets are nice and earnest, and the rest are mostly trolling misogynistic comments about white women in yoga pants.

So I decided to make a pumpkin that listens for new PSL tweets and randomly boos or applauds them. I call it the PSL modem. Spicy!
(In case it’s not clear from the video, the applause is coming from the pumpkin, not the laptop.)
The PSL modem is an Arduino Yún with an MP3 breakout board, operating wirelessly, working in conjunction with a helper script operating on a computer. The helper script uses ajax to check for tweets every 5 seconds (Twitter’s 1.1 API rate limit). It’s not strictly necessary, but it moves the Twitter API action out of the Arduino, which saves on overhead. (If you’d like to make the thing completely headless, check out Temboo’s Arduino library. But I like seeing the live tweets, god help me.) The PHP script passes the unique tweet ID to the Yún via the browser using the Yún’s mailbox library, which takes the format psl.local/mailbox/tweetID. Each time the ID changes, the Yún plays a random track from a collection of MP3s.
In case you’d like to build your own smartgourd, the PSL modem uses this hardware:
– Arduino Yún (for its fancy wifi and bridge library)
– Adafruit VS1053 MP3 breakout board
– Adafruit 3.7w Stereo Class D Amplifier
– Breadboard (or, if you’re smarter than me, perfboard)
– Male-to-female jumper wires
– Micro-SD card
– ≥3Ω speaker (I used this 8Ω, 1w model)
– Small USB battery pack (I use the Instapark MP1800U2 ‘cos it’s compact)
– Sugar pumpkin, or commensurate squash
…and this software:
– Arduino IDE 1.5.8 (beta) or greater
– Arduino script and helper PHP scripts
– Adafruit VS1053 library
– tmhOAuth library & Twitter API
– Laugh track MP3s (I used Amazing Sound Effects of Crowds)
– BlueHarvest for cleaning invisible temp files from your SD card (optional)
OK! First up: connect the Yún to your wifi network!
(You can follow along here.) When you first power up the Yún, it’ll create a wifi network called ArduinoYun-XXXXXXXXXXXX. Join this network with your computer, wait to obtain an IP address, and then navigate to arduino.local. When prompted, enter “arduino” as your password and click “Log In.” On the next page, click “Configure” to set up wifi. You can assign a name to the Yún (if you use anything other than “psl” you’ll need to change the PHP example pages accordingly). Choose your wifi network from the drop-down, enter the password and click “Configure & Restart.” Now you can rejoin your regular wifi network. After a couple of minutes, you should see a white LED on the Yún illuminate, meaning the Yún is online. (If you don’t, reset the wifi and try again. The relevant reset button is next to the USB port and is oriented sideways, and if you hold it in for >5 and ❤0 seconds, the Yún will recreate its original wifi network so you can try your configuration again.) Hey, look at that, you’re up and running!
Now’s a good time to head back to psl.local and identify your Yún’s IP address and MAC address for port forwarding, in case your server isn’t on your LAN (though this tutorial assumes that it is). In order for the Yún to receive commands from the browser located outside your LAN, you’ll need to forward a port to the Yún’s TCP port 80.
Now, let’s unplug the USB connection and then solder the VS1053 and amp to the header pins, then wire everything up.
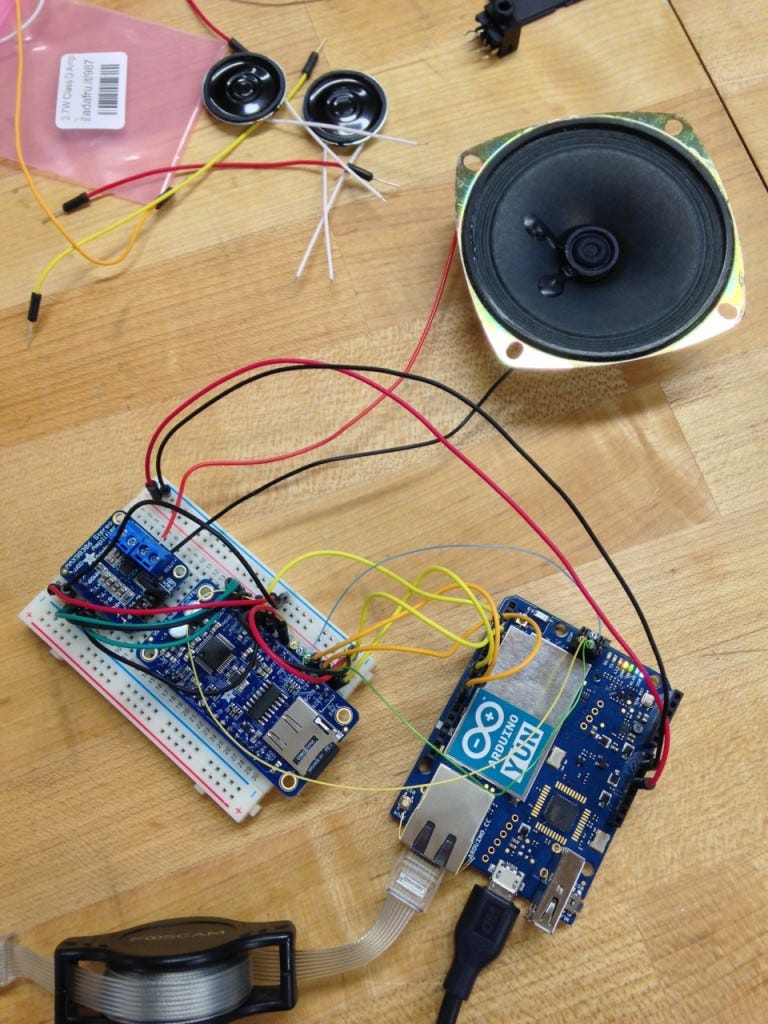
The VS1053 breakout and the stereo amp both need to be soldered to their header pins. (Or, I suppose, you could try using these solderless header pins from Sparkfun, but they get mixed reviews.) There are a lot of small connections, so work slowly and be careful. Adafruit has instructions here (for the VS1053) and here (for the amp). The amp is a little trickier, since it only has header pins on one side. As per the diagram, stick the leftover header pins between the amp and the breadboard to keep everything steady while you’re soldering.
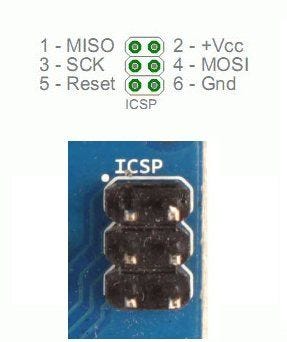
Once you’re done soldering, hook everything up. The VS1053 gets hooked up to the Yún as per these instructions (don’t wire in the headphone jack), with one important distinction. Because the Yún’s SPI interface doesn’t run through its digital pins (as with the Uno), you need to route the SPI pins on the VS1053 (CLK, MISO and MOSI) directly to the ICSP header on the Yún. This is where those male-to-female jumpers come in. Instead of using Arduino pins 11, 12, and 13, use the following schematic:
Once the VS1053 is wired, you can hook up the amp and the speaker, using these instructions. LOUT and ROUT on the VS1053 go to the L+ and R+ pins on the amp. L- and R- go to the AGND pins. Then use the speaker terminal you soldered earlier to connect the speaker. (If you have a red wire, that’s positive.) I only use the right channel. Who needs stereo inside a pumpkin? Consider using the jumpers to adjust the gain on the amp. It’s well-insulated in that gourd! But start low, so you don’t blow anything out while you’re testing.
Congratulations, you now have a completely functional physical setup. Let’s take a break and set up the Twitter API.

Head over to apps.twitter.com and login with your Twitter account info. Then click the button to create a new app. Provide all the relevant details, accept the terms, and create the app. Then, head over to the “Keys and Access Tokens” and take note of the Consumer Key (API Key) and Consumer Secret (API Secret). On the bottom of that page, generate your access token. Then take note of your Access Token
and Access Token Secret. You’ll need these to scrape the Twitter feed. (For each key, make sure you’ve copied the entire key. They often have dashes in the middle, and double-clicking on the text may only pick up everything on one side of the dash.)
So, let’s upload the PHP scripts (and CSS file) to your server of choice and test them out. They can be downloaded on github, and they consist of index.php, psl_json.php, and psl.css. Also download tmhOAuth and place it in the same folder. Remember those secret keys you copied? Paste them in the appropriate variables at the top of psl_json.php. (Note: it’s important to safeguard these keys, so you should look into the best way of doing that. Here’s a Stack Overflow thread with advice on how to store those API keys in php.ini, which is outside the webserver’s root.) Now, open your browser and load index.php. You should be seeing live tweets.
Now, format your micro-SD card as fat32 and upload your songs to it (and make sure the MP3’s filenames are ≤8 characters long). OS X creates many invisible temporary files and folders which can get in the way of your script’s efforts to pick and play a random track. An easy to way to resolve this is with BlueHarvest, which offers a 14-day free trial, but it’s not necessary. You should be able to get the same results with any tool / shell script / app that allows you to identify and delete invisible files.
Once the SD card is loaded and inserted into the VS1053, we need to do one more thing before we can upload your code. We have to remove conflicting SD card libraries from the Arduino app. Basically, the VS1053 comes with an SD card, as does the Yún. Both have competing libraries, so we’re gonna remove the Arduino IDE’s library and stash it elsewhere for later. To do this, find the Arduino app in your Applications folder. Right-click it and click “Show Package Contents.” Then navigate to Contents > Java > libraries > Bridge > src and remove FileIO.cpp and FileIO.h. Stash these somewhere so you can restore them later if you need to. (Or, you can always download a fresh copy of the Arduino app later.)
Now, it’s time to plug everything back in, upload the code to your Yún and test everything out. I’d like to take a moment and give credit to Aero98 on the Arduino and Adafruit forums, whose code for identifying and playing a random track I am adopting here. (I have added one thing to it, which is randomSeed— this uses the output of an unused analog pin to seed the first track. Without it, your random sequence will always start at the same place. I also corrected a memory leak by making “path” a global variable.) The rest of my code is adapted from two sources: the “MailboxReadMessage” example in the Yún’s bridge library, and the “player_simple” example in the Adafruit VS1053 library.
Assuming everything’s working as it should be, and your browser (or perhaps someone else’s, if your PHP files are hosted outside your LAN) is currently accessing index.php, you should start hearing your songs every time there’s a new tweet! You can unplug the Arduino from your PC and plug it into the USB battery pack to go completely wireless.
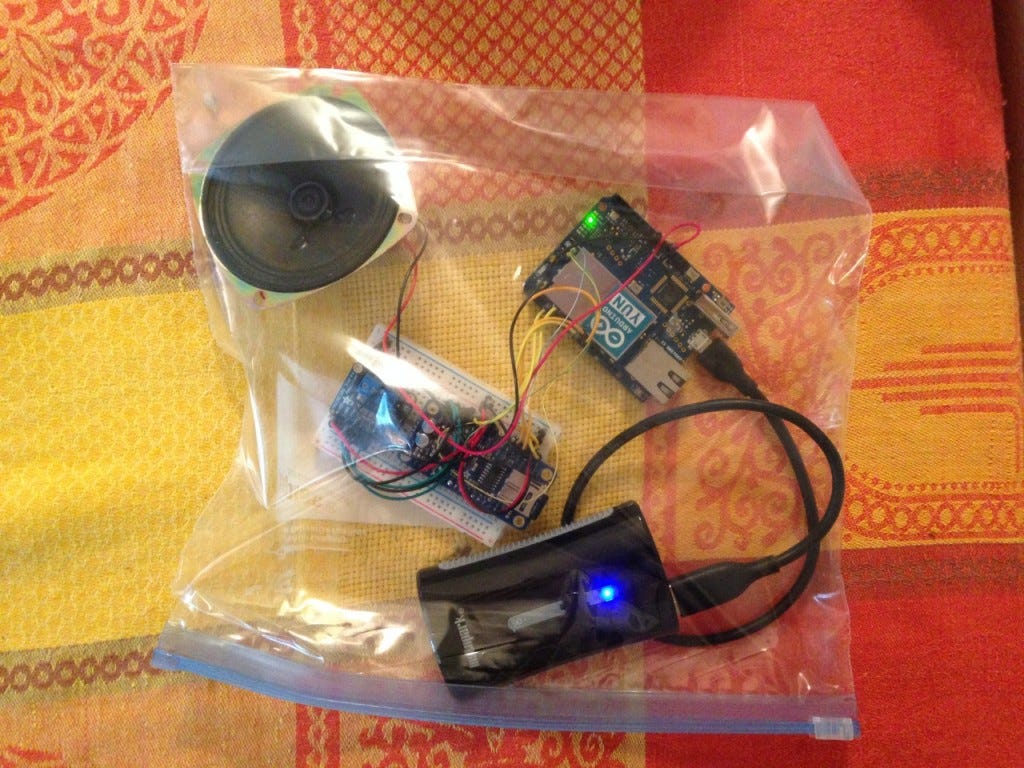
Onto the pumpkin. Select one that’s a little larger than you think you’ll need — the walls are thick, and the chamber somewhat small. Cut a hole in the bottom, and scoop the guts out (don’t forget to save those seeds for roasting!). The widest component I used is a 3″ x 3″ speaker, so that’s about the size of the hole I made in the bottom. Stuff your components haphazardly into a gallon-sized Ziploc bag (I invite you to find a more elegant and static-resistant solution), and shove them into your pumpkin like it’s a Thanksgiving turkey. (With an appropriately-sized gourd and gourd aperture, I find that everything stays in place pretty well without needing to be secured in any meaningful way.)
Flip the pumpkin over, and you’ve got yourself a PSL modem. Happy tweeting!